Showing posts with label handmade ideas. Show all posts

Card of the Week #6

Wednesday, August 29, 2012

Today is one of my favorite posts’ days. Sometimes I get so busy that I don’t have time to do anything other than finish orders, and create new items for my website. So, I created this ‘Card of the week’ series so that I can take a break from my business and simply create for the fun of it—and to keep my sanity. For some reason making cards makes me feel incredibly calm; and, I guess that’s why I love papercrafting as much as I do.

I made this card using the NEW Lawn Fawn stamp set ‘SweetChristmas’. It’s so cute! And it’s easy to use. There are so many possibilities with this set that sometimes I just stare at it and imagine all the things I can make with them. Now here’s how I made the card: 


Thanks for stopping by to check out another ‘Card of the Week’. Happy crafting! 

How it’s Made #2

Tuesday, July 31, 2012

A while back I started my new series named ‘How it’s made’. Where I show everyone how I make certain items I have listed in my shop; and, for this post I wanted to share how I go about creating my multipurpose zipper case.  

Here it is from start to finish!

These are the materials I use for the body of the case: 

The lining…
First I press all the fabric and apply the fusible interfacing. 
Next I sew those pieces to the white felt (This adds more body and padding to the case)

Next I prep the faux leather bottoms…
Then sew them to the pattern fabric, like so:
Next I whip stitch my zipper…

Then sew the zipper to the pattern fabric (zipper facing down)
Next, I sew the lining to the zipper and pattern fabric with right sides facing together…
Then repeat on the other side:
Next I edge stitch…
Next, I place the lining pieces together with right sides facing, and do the same with the outer pattern fabric and sew all the way around—making sure I back stitch for the opening on the bottom where I’ll turn the case inside out. 

Once it’s sewn all the way around I open the bottom with my seam ripper and flip the case inside out:


Next I sew the opening, and the case is finish. Then I add the finishing touching with the rings and tassel…

…and there you have it! My case from start to finish.  

Making Flyers for your Etsy Page using Microsoft Paint & Photoshop

Friday, October 21, 2011

Lately I’ve been having some trouble getting traffic on my new website, and I decided to revert to a traditional way of spreading the word about my website—flyers! I’m not a professional when it comes to making flyers; therefore, I used the only tools I had on my computer to create a clean, simple, and organized flyer using Microsoft Paint & Photoshop. Now, I’m sure I could have done the entire flyer on Paint, but I used Photoshop to arrange all my text and images because their features are a bit more convenient. 

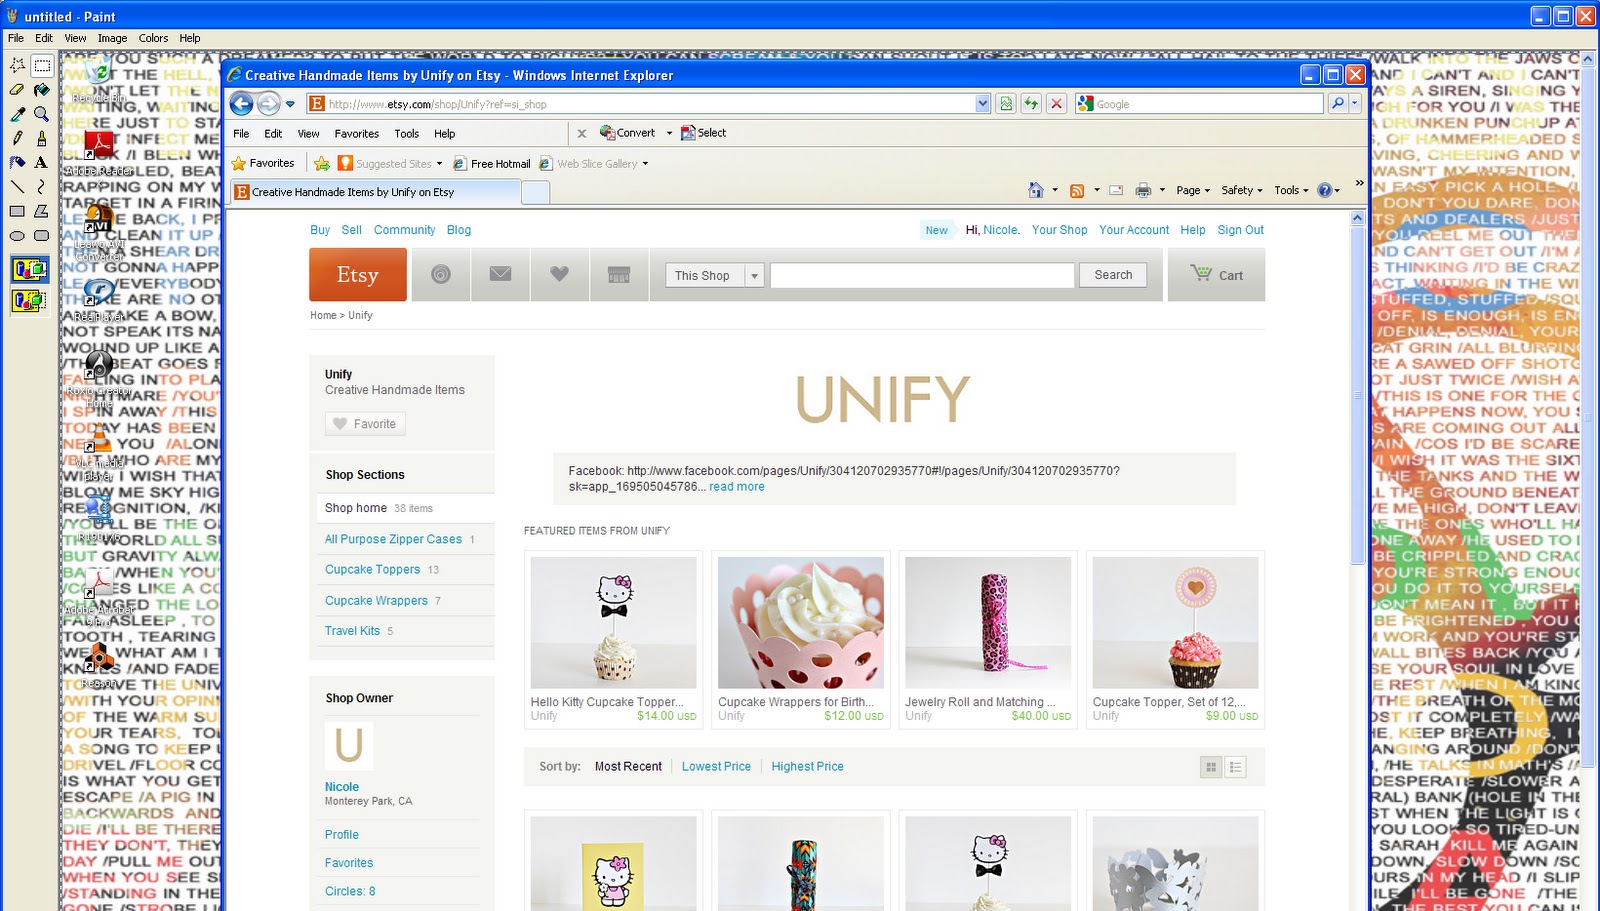
If you take a look at the flyer I’ve created you’ll notice I used my Etsy images—titles, prices, and all. Some of you may be wondering how I did that, and others might already know exactly what I did. Well, I took full advantage of my ‘Print Screen’ key (located on my keyboard), and became best friends with it. Here’s how I did it:

Go to your Etsy page, and use your ‘Featured Items’. They are all in a perfectly aligned row, and they would make for a great banner! To do this: press your ‘Print Screen’ or Prt Scr’ key. Next click your ‘Start’ button—located on the bottom left hand side of your screen.  Then click, ‘All Programs’, then click ‘Accessories’ and lastly go ahead and click on your ‘Paint’ program.

Once the program is ready to go, click on ‘edit’, and then click ‘Paste’. You should see a print screen of your entire screen.


Now all you need to do is crop the image you would like to use. To do this: simply click on the crop feature.


Then crop the image you would like to use.


Once you have cropped the desired image right click on that cropped image—then click ‘cut’. Next, you’ll want to is get  cropped image by itself; and what I do is click ‘File’, then ‘New’ (when it asks’ if I want to save I click ‘no’). Next, click ‘edit’ once again, and then click ‘Paste’. At this point only the image you’ve selected and cropped should appear. Then you can save and repeat for all the other images. Lastly, when all the images you need for your flyer have been saved you can use Photoshop to arrange all your images and text. Also remember to start with a new file that is the same exact size as standard printing paper (8 ½” x 11”).

What I also like to do is keep my Facebook fans up to date on what is going on with my website, and any time one of the items in my website is treasured I’ll share that treasury image with them on my page. The ‘prt Scr’ button works so well for sharing treasuries on websites:

I hope that this brief tutorial has inspired you to create your own flyers. I would advise taking some time out of your busy day to familiarize yourself with these basic programs. When running your own business it’s an added bonus to be able to do these types of things for yourself—in order to save some money.

Welcome to my Blog

Tuesday, October 11, 2011

Hello! My name is Nicole, and I’m an avid crafter. I love learning new crafts, and sharing my tips, tricks, and ideas with those who’d like learn them. I created this blog in hopes that I can help and inspire beginning crafters. Always remember it’s never too late to start crafting. I insist that everyone is good at something, and when people tell me they’re not creative I say, "creativity is in everyone". I get excited when people ask me questions about crafting, and I’d love to help anyone who wishes to learn what I know about crafting as well.
Thanks for visiting and I hope to gain some new crafty friends!
Proudly designed by | mlekoshiPlayground |