D.I.Y. Trick or Treat Bags for Halloween

Friday, August 31, 2012

Halloween is a time of sweet celebration; and, whether you’re hosting Halloween parties, celebrating with your children, or preparing for spooky trick or treaters— making candies bags is something we all have to do at some point. We all know that making cute treat bags is a fun process (well if you’re like me it’s fun, haha), but making them doesn’t have to break the bank. I’m going to show you how I made these treat bags, and also provide links and info as to where I purchased the tools I’m about to show you. 

I always check the clearance and dollar bins at my local craft stores, and every year one store in particular, Joanns, has holiday themed acrylic stamps for only $1.00. I purchased a few of the Halloween and Thanksgiving themed stamps, and I was super excited to get a chance to use them for this project! You can find this Inkadinkado stamp set and many others like it at your local Joanns Fabric store. 
Next, you’ll want to use a chalk ink when using the Inkadinkado stamps. These stamps are made out of acrylic and don’t take well to the normal ink pads; thus, chalk ink is the prime resolution to acquiring a clean crisp image. I like using the Dew Drop Multi-surface chalk ink, by Versa Magic, in Midnight black. 
Next, you can grab your treat bag. I’m using treat bags I purchased from a supplier on Etsy, The Lemon Drop Shop. You can find the listing for 100 of these Kraft bags for only $8.00 by clicking here. Once you have your kraft (or preferred treat bag), go ahead and apply some ink to your stamp, and stamp the treat bag with your preferred spooky image. 
The next set I’m going to use is the mini stamp set created by Lawn Fawn. You can find this set by clicking here. What I did with these is simply stamp a few of the pumpkins, in both sizes. Then color them in, and cut them out. 

Next I took my recollections tape runner and began adhering the pumpkins to the treat bag surrounding my stamped image. Then I stamped a few accents around the pumpkins and also stamped my sentiment. 


Once that was done, I filled my treat bag with yummy treats, grabbed my trusty Crop-A-Dile and placed two whole punches at the top which allowed me to string some twine through and create a bow. The twine I used for this project is made by Lawn Fawn, you can find the link to this product here

…and that’s it! You’re done. Doesn't it look so simple yet super cute? Go ahead and give it a try, or use this as inspiration for your own treat bag design. 
Thank you for stopping by once again! Feel free to leave a comment letting me know what you think. I love hearing from you. 
Follow my blog with Bloglovin

Card of the Week #6

Wednesday, August 29, 2012

Today is one of my favorite posts’ days. Sometimes I get so busy that I don’t have time to do anything other than finish orders, and create new items for my website. So, I created this ‘Card of the week’ series so that I can take a break from my business and simply create for the fun of it—and to keep my sanity. For some reason making cards makes me feel incredibly calm; and, I guess that’s why I love papercrafting as much as I do.

I made this card using the NEW Lawn Fawn stamp set ‘SweetChristmas’. It’s so cute! And it’s easy to use. There are so many possibilities with this set that sometimes I just stare at it and imagine all the things I can make with them. Now here’s how I made the card: 


Thanks for stopping by to check out another ‘Card of the Week’. Happy crafting! 

How it’s Made Monday—Coin Purse/Point ‘n Shoot Camera Case

Monday, August 27, 2012

Today I wanted to show how I go about making my coin purses from start to finish, for my ‘How it’s Made Monday’ post. When I originally created the pattern for this coin purse, I made it big enough to carry cash money, credit cards, and loose change. But one day I received an email from a women who purchased one of these coin purses from me and she realized that this case is the perfect size for a point ‘n shoot camera as well! I was so excited about that. I even tested it out on my Sony—and she was right! So from now on I’m going to advertise this case as a multi-purpose mini case. I love anything with the word ‘mini’ in it, LOL. Anyway, let’s get this crafty party started! Here’s how I make it:


First I cut my outer fabric, lining, interfacing, and padding. 

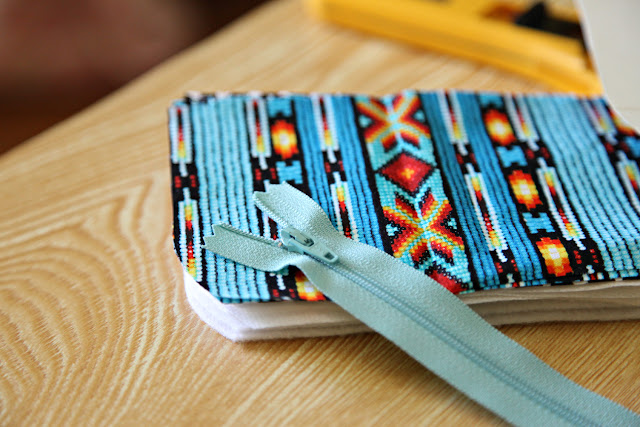
Next I search for the perfect color zipper and piping to match the case. 

…this looks great.
Next I gather the main fabric and fusible interfacing and press them together. I love to use fusible interfacing because it makes the pouch much sturdier and clean looking. 

Once that is done, I grab the lining and press it—removing any and all wrinkles. 
Next, I whip stitch my zipper. 

Once I’ve whip stitched my zipper, I grab my felt interfacing and sew it the main fabric, then also sew the piping to only one side of the main fabric like so: 

Now I can apply the zipper…
Sew on the lining, with right sides facing each other. 
…repeat on the opposite side. 
Now, this is an important step: Edge stitch and open your zipper. 
Then you can take the lining and pin right sides facing each other, and do the same with the outer part of the case. 
Sew all the way around, and cut off excess. 
Next make a small opening at the bottom of the lining and turn inside out. Once it’s turned inside out sew the opening at the bottom.

Then it’s complete!

See…it fits my camera! So cute. 
Thank you for stopping by and I hope you enjoyed this Monday post :-D This case and a few more like it will be for sale in my shop very soon! 

Foodie Friday—Homemade Butter, turned into Compound Butter

Friday, August 24, 2012

Its Friday again and there’s no better way to celebrate this day then by creating another food post! Today I wanted to make something I’ve been dreaming about making for some time now—Butter! I think since a young age I’ve always been curious as to how it’s made; and recently I found out its incredibly easy. The actual butter making process is very easy, but I wanted to take my butter up a notch. I used to work at a country club and I remember they used to serve this delicious looking sweet compound butter that I always wanted to try—but couldn’t. So I wanted to finally make some for myself to serve up on a freshly baked French baguette. So, enough chat, I want to show y’all how it’s made.

Ingredients
Whipping cream (If you’re only making the butter then whipping cream is all you need)
Almonds
Vanilla extract
Confectioners sugar

Tools
Jar
Bowl
Colander
Cheese cloth
Food processor 


Ok! First you add the cream to your jar (I didn’t measure; I just filled the jar up almost half of the way, there just has to be enough room to shake). 
Next, apply the lid and ensure that it’s secured tightly. 
Shake non-stop for 10-15 minutes. 
The cream is starting to thicken!
Once the liquid has pulled away from the butter its ready! Now just remove the buttermilk (and save it), and get your bowl, cheese cloth, and colander ready for the water wash. Here’s how to make the water wash: simply add ice cold water to your bowl, place the colander in the bowl, and place your cheese cloth on top. 


Once the butter is in the wash, gently toss it around in the bath, and then lightly drain. 

Once you’ve drained the butter remove it from the cheese cloth and wrap it in cellophane wrap, then place it in the fridge for about 10 minutes. 

While the butter is in the fridge, take the sliced almonds and ground them up in the food processor, I used the whole bag and it was too much, so maybe you can only use half the bag. 
Next add 2 tbsp. of confectioners sugar, 1 tsp. of vanilla extract, and 2 tbsp. of the ground almond mixture to the butter and mix. 


Next, I sliced myself three pieces of baguette and placed the compound butter in the cellophane wrap again, and placed it into the fridge to form a block of butter (and to save for later). But for now I’m going to enjoy these toasted breads with my sweet compound butter…OMG! I just tasted it and it’s so good! You must try it. 

Have a great Friday! 
Proudly designed by | mlekoshiPlayground |