Showing posts with label fabric. Show all posts

D.I.Y. Passport Cover

Monday, October 8, 2012

I haven’t done a sewing D.I.Y. project in a while so I thought I’d show how I make passport covers. I used to make these a lot but I kind of forgot about them for a while. However, since the holidays are coming up I thought I’d bring out my old gift giving (or stocking stuffer) patterns so I can have those ready for Christmas. I tweaked this pattern a little by adding some satin ribbon to keep the sleeve closed at all times + I think it’s just a really cute touch.

What you’ll need for this project:
Sewing machine
Cotton fabric (2 types)
Fusible interfacing
Ribbon
Thread
Scissors
Homemade pattern

Step 1: Cut the main part of your pattern to 8 ¾” x 6 ½” in size, and cut another piece of paper (the side flaps) to 2 ½” x 6 ½” in size. Then don’t forget to mark them so in the future you’ll know what they are. I have tons of homemade patterns and trust me when I say it helps to name them ;-) 
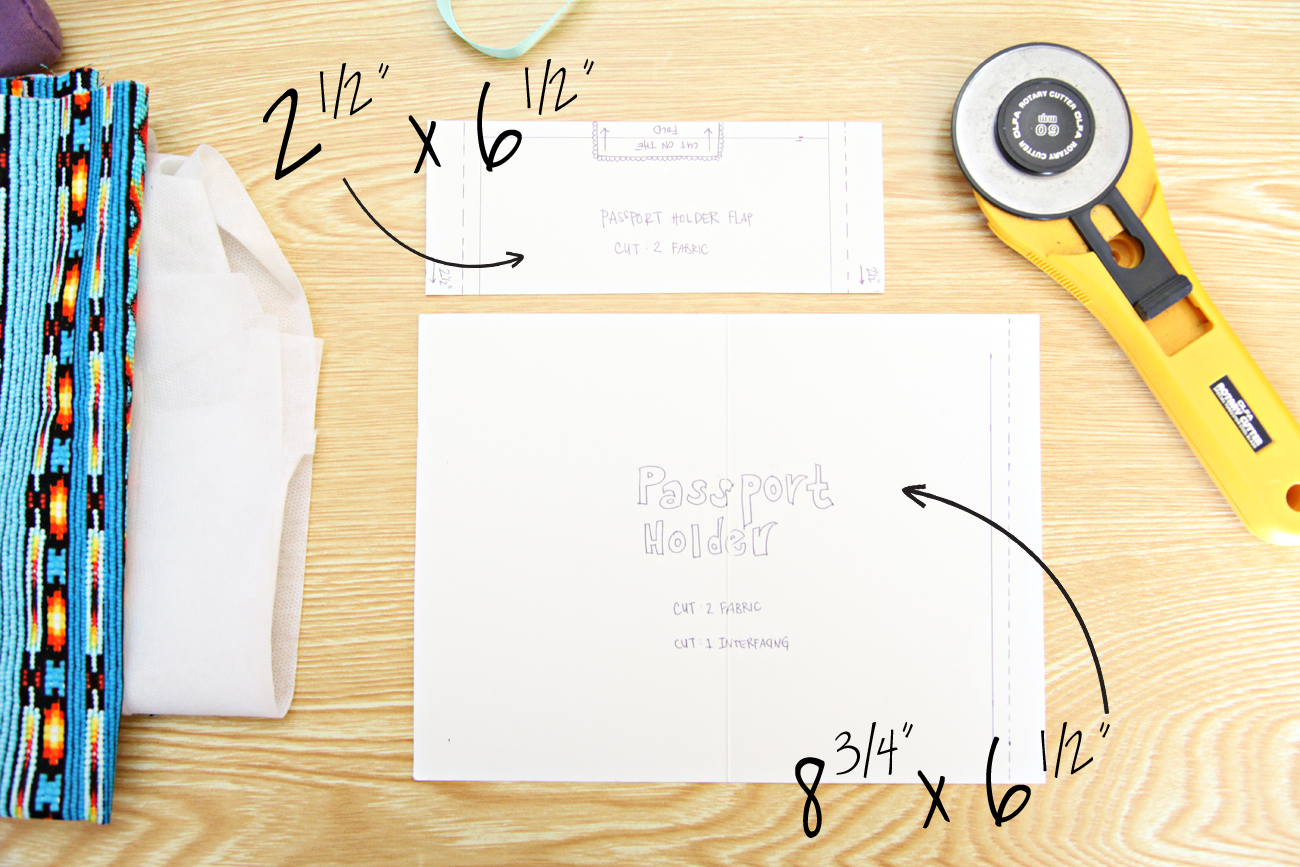
Step 2: Cut 1 main passport cover piece using your outer fabric and 2 flap pieces. Don’t forget to cut the flap pieces on a fold like so: (super important)
…you’ll end up with this: 

Step 3: Cut the same pieces using your fusible interfacing. (<<click link for fusible interfacing example). 
Step 4: Cut 1 main passport cover piece using your lining fabric. 
Step 5: Press (iron) the fusible interfacing to your main fabric pieces and fold the flap pieces in half and press like so:

Step 6: prepare your ribbon pieces.
Step 7: attach ribbon like so on the left and right side of the main part of the passport cover. 
Step 8: Place the flaps on both the left and right side of the main piece with the open sides facing out. 
Step 9: Place your lining over the main piece, ribbon, and flaps with right sides together. Next sew all the way around, and don’t forget to backstitch where you want to leave your opening!

Step 10: Trim the corners. 
Step 11: Open the bottom and turn inside out. 

Step 12: Edge-stitch all the way around the case. 
You’re finished! 

How it’s Made #2

Tuesday, July 31, 2012

A while back I started my new series named ‘How it’s made’. Where I show everyone how I make certain items I have listed in my shop; and, for this post I wanted to share how I go about creating my multipurpose zipper case.  

Here it is from start to finish!

These are the materials I use for the body of the case: 

The lining…
First I press all the fabric and apply the fusible interfacing. 
Next I sew those pieces to the white felt (This adds more body and padding to the case)

Next I prep the faux leather bottoms…
Then sew them to the pattern fabric, like so:
Next I whip stitch my zipper…

Then sew the zipper to the pattern fabric (zipper facing down)
Next, I sew the lining to the zipper and pattern fabric with right sides facing together…
Then repeat on the other side:
Next I edge stitch…
Next, I place the lining pieces together with right sides facing, and do the same with the outer pattern fabric and sew all the way around—making sure I back stitch for the opening on the bottom where I’ll turn the case inside out. 

Once it’s sewn all the way around I open the bottom with my seam ripper and flip the case inside out:


Next I sew the opening, and the case is finish. Then I add the finishing touching with the rings and tassel…

…and there you have it! My case from start to finish.  

New Fabric and a Sewing Announcement

Tuesday, April 17, 2012

Hi everyone! I hope you’re all having a happy and productive Tuesday! I just wanted to share this beautiful image of the new fabrics I’m using to make some really cute coin purses and new camera cases. Recently I took my usual trip downtown in search of new colorful tribal prints and overall bright fabrics, and I think I was successful this time around. The fabric store that I frequent was loaded with new prints and I couldn’t be more excited to eventually work with them all. While I was browsing through the sea of beautiful fabrics I decided that I would put all my paper crafting tools away for a few months so I can get back into my first crafty love—which is making purses. When I started my new shop (Unify), I wanted to have a mixture of everything I make; such as, purses, cases, zipper pouches, tags, cards, toppers and everything else. But I found myself mainly working with my paper crafts because I couldn’t get enough of them! However, now I’m feeling the sewing itch. Many nights that I’m about to go to sleep I think of new ideas for my shop, and those thoughts and ideas are starting to consist only of fabric and new purses designs. Therefore, get ready for my purse comeback! I can’t wait to share all my new and old designs with everyone.  
Proudly designed by | mlekoshiPlayground |