Shhhh! Borrowing Your Sisters’ Necklace and Making it Your Own—For the Day

Monday, February 27, 2012

My sisters are always nagging me about borrowing their stuff—most of the time without asking. Sometimes they never even realize I’ve taking their wonderful accessories and turned them into something different to fit my style. Take this cute gold and cream braided necklace (it’s probably not real gold). I love the look, and I love the color combinations; but I can’t get over how it looks like a choker when I wear it—and I’ve never been a fan of chokers. They look weird on me. So, I decided to extend it a bit using some of things I had laying around my craft table:
-Ribbon
-Removable Rings
-Scissors
Check out how I did it! Here is the starting point:
Now, simply open up the rings (You can find these at your local craft store)
Then simply attached the rings to the ends of the necklace, like so:
Slip your ribbon through the rings and tie knots (at the length you prefer):

Then simply tie the ends of the ribbon together creating a neat looking bow:
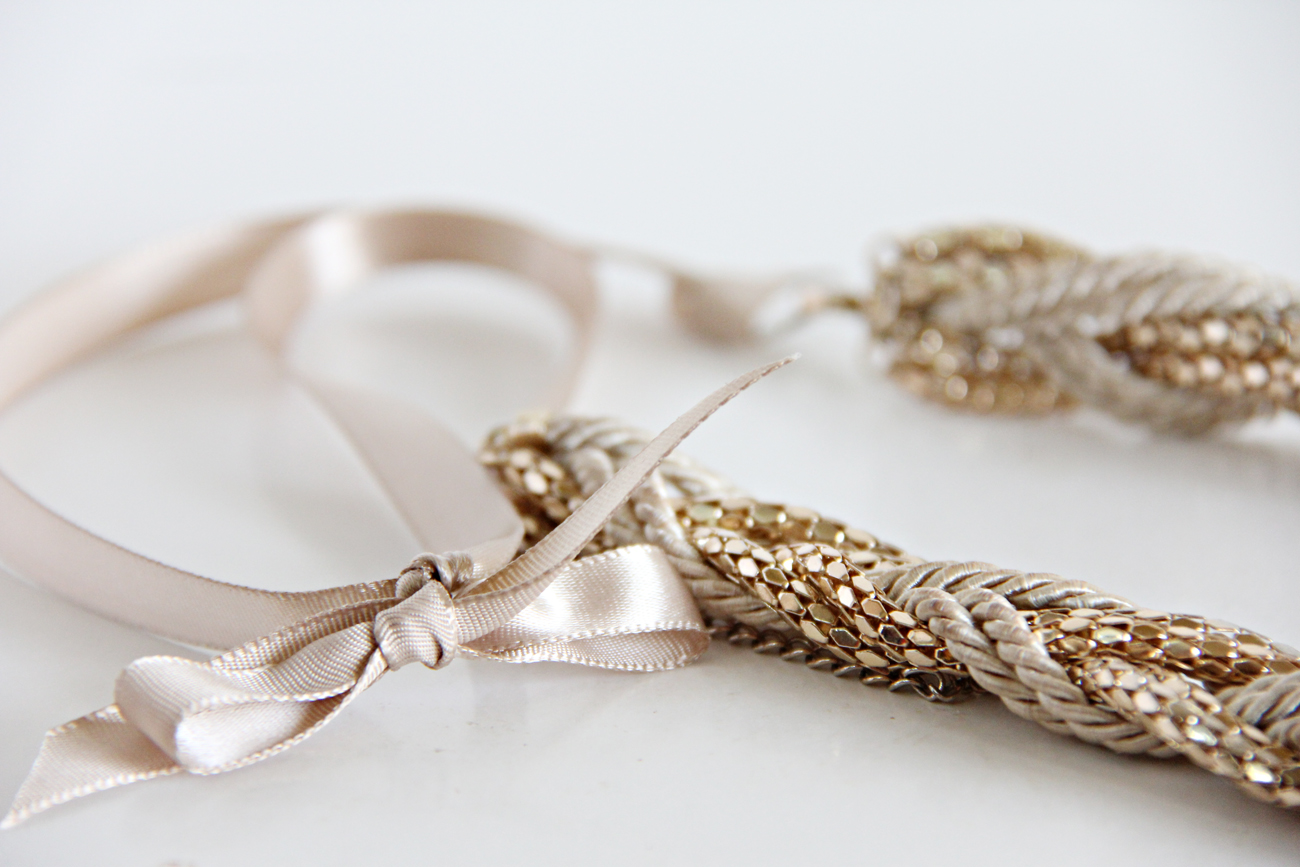
Then you’re done! Check out this new and improved necklace!


After I fixed up this necklace I went back to my sisters’ room to shop for some more borrowed goods, and came back with some matching pieces! Hahahaha—she’ll never know—because she never reads my blog. Also, the great thing about using removable rings is you can take them off when you’re done with the necklace and put it back in your sisters’ jewelry box without her even knowing! ;)

Cute Gift Card Holder Idea for Cricut Users and Paper Crafters

Sunday, February 19, 2012

Hello! I’m excited to be showing everyone how I go about making my gift card holders. I’ve been working on a lot of birthday cards, toppers, and many other things. So, I thought I’d share this cute idea with all my Cricut/paper-crafting friends. If you don’t have a Cricut or some of the tools I have, don’t worry. If you’re like me you’ll find a way around not having some of these tools.
Moving forward, the Cricut cartridge I’ll be using for the envelope is, “Just Because” Cards; and the paper I’m using for the envelope and card holder insert is the 70lb Kraft paper—my favorite paper!

After you’ve powered up your Cricut set the size to 4 inches, and select the ‘Canoe’ envelope feature and hit cut. Once that has been cut out, raise the size from 4 to 4 ½” inches, then click your shift button, and click <Pickle’s>. Then click cut. Once you’ve cut those out remove them from your mat, and score the envelope.
Next, pick your pattern paper! I love flipping through the pages of my paper stacks.
Once you’ve selected the paper you would like to use go ahead and choose a base color as well. I’m choosing pink as my base color. Remember to cut the base color smaller than the size of the envelope, that way you have a border; and do the same for the patterned paper as well (Make it smaller then base paper).

Then what you can do is use a brown chalk or ink around the edges to give it a vintage look (Optional).
Next I cut out a pretty shape that will be one of the main parts of the ‘Happy Birthday' Message. I cut these using my Cuttlebug.


Then I add a cute flower stamp with a very light pink color—for added cuteness.
Next I used a ‘Happy Birthday’ stamp with dark pink ink on a scrap piece of paper that is the same color as the base piece of paper (pink). Then hand cut that out and glue it to the shape stamped with a flower pattern like so:

Then what I like to do is use foam tape to add a 3D effect:

Then from this point, you can add a pretty ribbon or a cute hand-stamped message.

Then once you’ve decided to use the ribbon or the stamp go ahead and glue the entire piece onto your Kraft envelope.
Lastly, go ahead and cut some corners onto the insert so you can easily secure the gift card, then you’re done!

I hope you’ve enjoyed this tutorial! I know I had tons of fun making this for my shop; and if you like this cute gift card holder but would rather not make it, feel free to stop by my shop and buy one!

A Great Place to Shop for Craft Supplies in Los Angeles

Sunday, February 12, 2012

     This weekend I decided to put down my crafting tools to go on a mini shopping spree for my shop. I absolutely love that fact that I only live ten minutes from Downtown Los Angeles because of the amazing craft, fabric, and hardware stores that the city of L.A. has to offer. This weekend I stopped at one of my favorite shops to buy ribbon—Moskatels.  Moskatels is a store that has everything for ones crafty or party planning needs. I like to think that the big-gun party planners of Hollywood stop at this location because of some over the top pieces Moskatels’ carries that only celebrities can afford to buy. However, aside from some of their vases I could never afford; they have a ribbon isle that must have come straight from heaven. The array of colors and modest prices simply have to be heaven sent. I feel like a nerd when I say that I get the chills walking down the ribbon isle, but if you have a passion for all things crafty the way I do you’ll understand my excitement when I walk into this: 
I wish I had better pictures of this store, but like most places of business downtown they frown upon customers taking pictures of their amazing products. But, I managed to sneak a quick photo with my point and shoot camera—hence the poor image quality. This store has everything you can think of: ribbon, baking supplies, all party supplies, a wide variety of item boxes and baggies for crafters and bakers, and so much more.

I’m so glad I went shopping at Moskatels this weekend because while I was browsing the store I found these clear poly bags that I’ve been looking for everywhere. I wanted these poly bags to hold all the cards, tags, and cupcake toppers I sell, and I’m so happy I found them here. The poly bags I got make my items look so much more professional, and they’re perfect for a craft fair I’ll be doing soon. I want to post more photos of the bags I’m speaking of. Maybe I’ll do a quick tutorial on how to use them to wrap cards and other items.

Thanks for stopping by for a quick read, and if you love crafting or party planning as much as I do this place is a must! Let me know what you think if you happen to stop by Moskatels when stocking up on tools. Also, let me know if you know of other places just like this—I’d love to check them out.
F.Y.I. Moskatels has a parking garage and the parking is free for up to two hours if you spend more than $4.00. If you try to park anywhere else it’ll either be a hassle or expensive.

Product Gift Wrapping Part Two

Thursday, February 9, 2012


Hello! I hope everyone is having a great day! In my previous post I said I was going to share a video I recorded of me wrapping some stationary and here it is. I hope you enjoy it, and stay tuned for another. I’ll be showing how I wrap my tags and cupcake toppers with poly-bags, card stock, and stamps.

Product Gift Wrapping that’s Adorable & Affordable

Tuesday, February 7, 2012

As a seller I’m always looking for cute ways to wrap my sold merchandise before it’s shipped. I’ve tried lots of different ways to wrap my cupcake toppers, zipper pouches, stationary and more; but lately I’ve discovered that using wax paper to wrap most of my items looks so cute, and one roll of wax or parchment paper can go a long way—which allows me to save money. I snapped a few pictures, over the weekend, of the tools I use to wrap a zipper pouch and the end result. I hope you like it!
What I love about using wax paper is: it keeps the product safe from dust, debris, and possibly water as well. But not only does the wax paper serve as a good protector, it also looks cool because the wax paper is transparent.  Try using wax paper when wrapping your next order and share you pictures here! You can contact me when the images and I’ll share them on my blog.
Today while I was getting an order ready for shipment I thought I’d record the entire process. So, I’m going to get started on editing that video so you can see how I go about wrapping stationary as well.
Stay tuned for my video to see how I use wax paper to wrap stationary. Also coming soon, a video showing how I wrap my cupcake toppers using poly-bags, card stock, and stamps!
Proudly designed by | mlekoshiPlayground |