Welcome to another Mama Elephant Designer Series! Today the design team an I are using the new (and adorable) stamp set, Tandem Ride, to create our samples. I just love how this set comes with lots and lots of adorable critter images and elements to create such adorable scenes on your projects. They've also released a set filled with lots of coordinating extras and beautiful calligraphy sentiments--much like the one shown in the image above, click the following link to view that set, Tandem Extras.
I also choose to use the Femme Frames die once again, but I just can't help using it--when I'm making ME cards it's one of the first things that I reach for. I just love it! I also decided to do some more watercoloring for the panel in the background. I only used two distress ink colors and I think the results came out just great. I think this set is just the cutest! If you'd like to take a look at the other DT samples feel free to click, here, and view them!
Thank you so much for stopping by!
Showing posts with label watercolor. Show all posts
So Many Thanks
Wednesday, July 1, 2015
Hello everyone! Today I'm super excited to share the card I created using the new stamp set, Charmed. This stamp set is packed with so many whimsical images and coordinating sentiments--this is one of those stamp sets that makes card making so easy because of how great each of the images work together and the sentiment variety means you can use this stamp set to create so many different types of cards and projects.
I always love using the watercolor technique when using Mama Elephant stamps--that technique always go so nicely with any of their images. I used light yellow cardstock for the card base an the scalloped panel, and used a variety of pastel Copic colors. This little sleeping fox is so adorable!
I always love thinking of different ways to use my stamps, and I thought that the wreath in this set would be perfect for creating Thanksgiving, and Christmas cards, too. All you'd have to do is color the wreath in according to the holiday you'd use it for and maybe even add a Santa hat to the fox or owl. How cute would that be?!
I hope you enjoyed this card and thank you so much for stopping by!
Pretty Pink Posh Watercolor Blog Hop
Thursday, June 4, 2015
I'm also using a few Pretty Pink Posh products to create this card, like the new 6mm iridescent sequins, Sunshine Glow. I'm also using the stitched cloud die from the set, Stitched borders 2--also by PPP.
Blog Hop Details: This hop is officially open to the public tomorrow (June 5th at 6:00am PST) and ends June 8th at 11:55pm PST. So you'll be able to create your watercolor creations and link them up on the PPP blog. You can click here to head over to the Pretty Pink Posh blog hop!
Additional info: If we can get 100 entries, Paulina will donate a $20 gift certificate to Ellen Hutson orSimon Says Stamp. 200 entries? She'll donate another! For every 100 entries (up to 500) there will be an extra $20 gift certificate!
I hope you really enjoyed this card and thank you so much for stopping by!
Labels:
blog hop,
dies,
paper crafting,
pretty pink posh,
sequins,
watercolor
Just Saying Hello
Tuesday, March 3, 2015
The last time I was shopping at Micheals I stopped in my tracks by this adorable Mermaid Kiddo rubber stamp image by Stampendous. I thought this would be perfect for so many things--including a greeting card. I also thought, with watercoloring being so popular right now, that this image would be perfect for that medium. This was my first time watercoloring a large image like this so I wasn't too sure how it would turn out but in the end I just loved it.
I colored in this image using only distress inks. For the ocean background I used Salty Ocean, Peacock feathers, Tumbled glass, and Chipped sapphire. That combination of blues turned out so well. I don't have any skin tone colors so I combined the colors Tattered rose, and Tea dye. Then I added Spun sugar for her cheeks. For her hair I used Scattered straw, Mustard seed, and a little bit of Tattered rose; and for her sea shells and fin I used Shabby Shutters and Bundled sage. Also, the shells she's wearing were colored in using Shaded lilac and the adorable little sea horse was colored in using both Mustard seed and Spiced Marmalade.
To finish off the card I used the 'Just saying Hello' sentiment from, Grand Greetings by Lawn Fawn on some vellum paper as well as Sparkling Clear, and Aquamarine sequins by Pretty Pink Posh.
I hope you all enjoyed this card. I had so much fun coloring it all in! Also, stay tuned for a new video by me on the Lawn Fawn blog tomorrow. If you head over to their blog you'll noticed I have a card there for Scrapbook adhesives week and I'll be sharing how I made that card! I'll also share the video and images here on my blog, tomorrow.
Throwback Thursday--Crafty Edition
Thursday, February 26, 2015
I'm doing a crafty throw back and using this old school (well it's not really THAT old) Lawn Fawn stamp set, Grand Greetings. I created this A2 size card with a piece of watercolor cardstock and I used some dark blues, pinks, and purples for this abstract background. I also placed a piece of vellum over that watercolor piece and heat embossed the sentiment in white embossing powder. To fill the inside of this shaker card I used some Pretty Pink Posh sequins. Shaker cards are the best!
New Flutter By Coordinating Dies--With Video
Saturday, January 17, 2015
DIY--Watercolor labels
Friday, October 31, 2014
I know it’s Halloween and I should probably be posting something
a little bit more dark and spooky but I have to be honest—I’m not really much
of a Halloween person and plus I think I already got all of my Halloween mojo
out in this card (click here to view) that I made for the Lawn Fawn blog. I
sort of ran out of Halloween ideas really fast this year. I think my holiday creativity
usually starts to pick up around Thanksgiving and Christmas but those blog post
ideas will have to wait because I have a really fun and easy DIY for you today!
I’m featuring the Lawn Fawn stamp set, Sweater Weather, and
this stamp set is such a hit because of all the fun images and sentiments in
this set. But, one other great thing about this set is the beautiful and
whimsical boarder image provided. This image screams, label—especially because it
also has a coordinating die, making it easy to mass produce.
I’m using watercolor paper—you don’t really need any fancy
waterpaper for this project but I do have a rather awesome watercolor block
that I purchased from Blick in Los Angeles. What I love about this Fluidwatercolor paper is that it’s adhered down on both the top and bottom so keep
the edges of the page from warping and making it impossible to paint—and all of
you who have already dabbled in the art of watercolor know exactly what I’m
talking about. This block only has 15 sheets in it but it’s a great size; and,
it’s really thick paper so your watercoloring won’t seep through pages like one
might think. I’ve had a question from a few friends about this block asking if
the pages are easy to remove and YES they totally are! I love this block so
much I can’t go enough good things about it. I think this pad was under $4.00,
too.
I’m using a watercolor brush, and a watercolor set that I
purchased from Joanns with a 50% off coupon. The original price for this
watercolor set was about $8.00—which means I got it dirt cheap. When I first
saw it I was thinking to myself, “there’s no way these are going to be that
great” because of how cheap they were but I have to say they’re quite impressive.
I tried a range of watercolors—even watercolor pencils and I think these might
be my fav!
Now that I’ve covered the two main tools used for this
project I’m going to get started on the labels. I just had a little cup of to
water by my side and started to get my brush really saturated with water. Next
I began to pick up color and simply create ovals on my paper—estimating the
size they’d need to be to fit in the frame image from the Lawn Fawn stamp set.
Next I simply take some VersaFine ink in onyx black and start
stamping the frame image over the abstract ovals—after they’ve dried, of
course.
Once I stamped them all out I took my coordinating die and
cut them out using my Cuttlebug. Once they’re all cut out you can store them
away and save them for a party or you can use them right away like I did with
these treat bags. I stamped out a few names on these labels using the Lawn Fawn
alphabet stamp set, Violet’s ABCs. I made the treat bag using the awesome goodie bag die by Lawn Fawn—click here to view it. I also used their new paper line
which can also be found, here. If you have any questions in regards to this
project please feel free to ask! I really hope you enjoyed this easy DIY and if
you have an Instagram feel free to DM me your projects! I love when people do
that—it makes my day. You can follow me @unifyhandmade.
Have a great weekend!
DIY Watercolor Wedding Table Numbers
Friday, July 11, 2014
If you’re a bride on a budget; or, the friend of a bride on
a budget this simple DIY is perfect for you! I’m using simple, easy-to -find
tools, to create some gold and watercolored table numbers—that are right on
trend. This watercoloring technique has been taking the crafting world by storm
and it’s only natural that it would start popping up in places like wedding decor.
What you’ll need:
-Wooden Frame, purchased from Michaels
-Gold Spray paint, purchased from Walmart
-Watercolor Paper, purchased from Joanns—I used a 50% off
coupon
-Watercolors, purchased from Joanns—I used a coupon for that,
too
-Paint brush
-Pencil
-Scissors
-Computer
-Printer
-Photoshop or Microsoft Word
Step 1: remove the packing and the sample image from the
frame, so that you’re left with just the frame itself.
Step 2: Head outside with a few pieces of cardboard of newspaper,
place the frame in the center and start shaking the spray can to prep. Once you’ve
shaken the spray can enough being to spray with even sweeping motions and hold
the can a few inches away from the frame to avoid puddles. Once you’ve sprayed
once side—allow it to dry and flip it over and spray the backside, as
well.
Step 3: Go back indoors while you allow the frame to
completely dry and take the sample image that comes with the frame then place
it over a sheet of watercolor paper and trace it with your pencil.
Step 4: Cut it out using your scissors, and prepare for
painting.
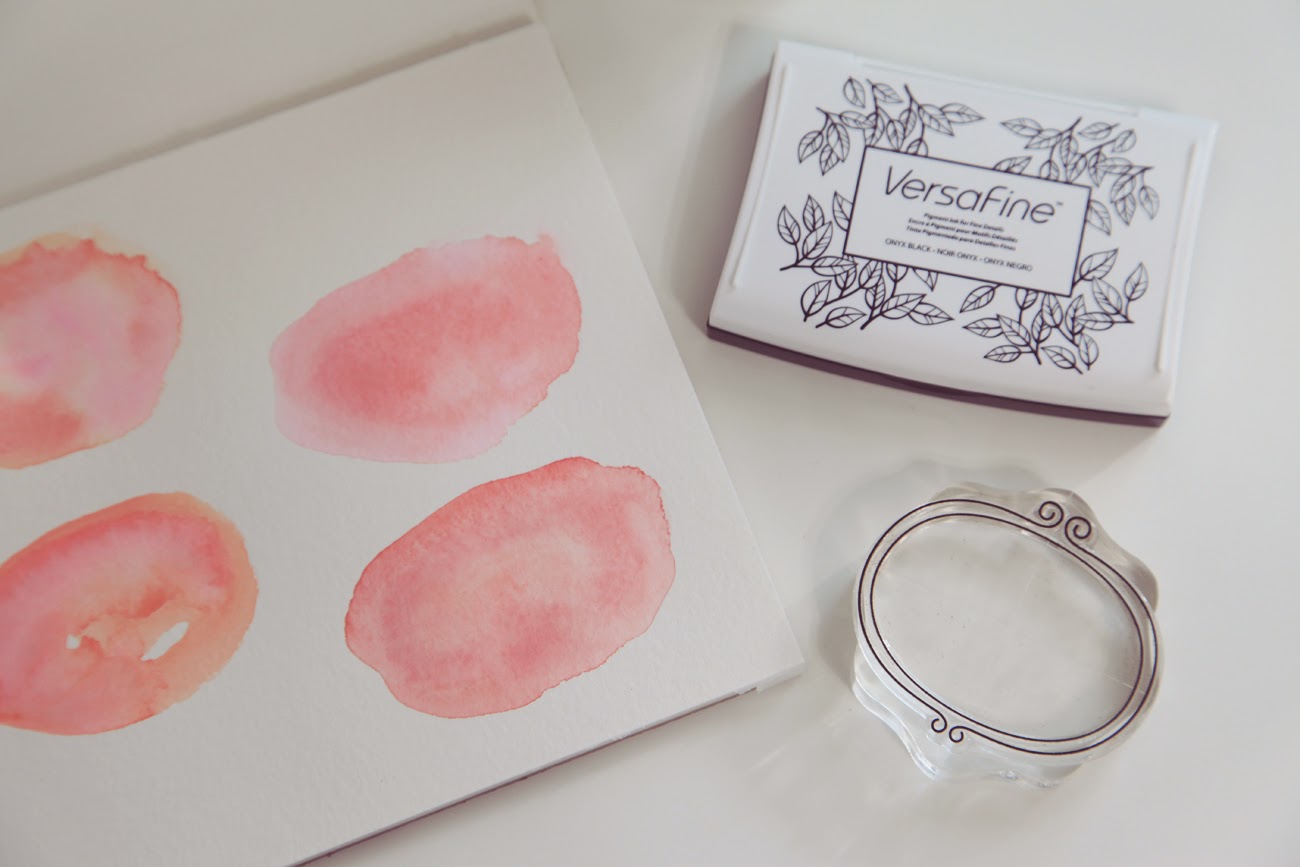
Step 5: This is where you will begin your watercoloring. Tip—What
I like to do is dip the brush in clean water and apply that to the paper first.
Once I’ve applied the desired amount of water to the paper then begin to add in
the color. What’s great about applying the water first is that the paint will
stay within the pre-watered area and you can work your way in and start
blending with more colors. When you get the desired look, let it dry.
Step 6: Once it was dry I went over to my computer (using Photoshop,
but I’ve done this before with Microsft Word before, too) and created ‘table
no.’, and number 5 and changed the print settings to 4x6—which is the size of
the watercolor paper I’m using for this project and simply print it out. You
can repeat this entire process for all the other table numbers needed. You
simply write out the numbers by hand, use some stamps; and, even create
matching cards, menus, and invitations with this method, too. The possibilities
are endless.
Step 7: Place the table number into the frame, and you’re
finished!
I really hope you enjoyed this simple yet chic DIY tutorial and
feel free to leave me a comment letting me know what you think!
Subscribe to:
Comments (Atom)


