Showing posts with label party decor. Show all posts

DIY--Watercolor labels

Friday, October 31, 2014

I know it’s Halloween and I should probably be posting something a little bit more dark and spooky but I have to be honest—I’m not really much of a Halloween person and plus I think I already got all of my Halloween mojo out in this card (click here to view) that I made for the Lawn Fawn blog. I sort of ran out of Halloween ideas really fast this year. I think my holiday creativity usually starts to pick up around Thanksgiving and Christmas but those blog post ideas will have to wait because I have a really fun and easy DIY for you today!

I’m featuring the Lawn Fawn stamp set, Sweater Weather, and this stamp set is such a hit because of all the fun images and sentiments in this set. But, one other great thing about this set is the beautiful and whimsical boarder image provided. This image screams, label—especially because it also has a coordinating die, making it easy to mass produce.

I’m using watercolor paper—you don’t really need any fancy waterpaper for this project but I do have a rather awesome watercolor block that I purchased from Blick in Los Angeles. What I love about this Fluidwatercolor paper is that it’s adhered down on both the top and bottom so keep the edges of the page from warping and making it impossible to paint—and all of you who have already dabbled in the art of watercolor know exactly what I’m talking about. This block only has 15 sheets in it but it’s a great size; and, it’s really thick paper so your watercoloring won’t seep through pages like one might think. I’ve had a question from a few friends about this block asking if the pages are easy to remove and YES they totally are! I love this block so much I can’t go enough good things about it. I think this pad was under $4.00, too.

I’m using a watercolor brush, and a watercolor set that I purchased from Joanns with a 50% off coupon. The original price for this watercolor set was about $8.00—which means I got it dirt cheap. When I first saw it I was thinking to myself, “there’s no way these are going to be that great” because of how cheap they were but I have to say they’re quite impressive. I tried a range of watercolors—even watercolor pencils and I think these might be my fav!

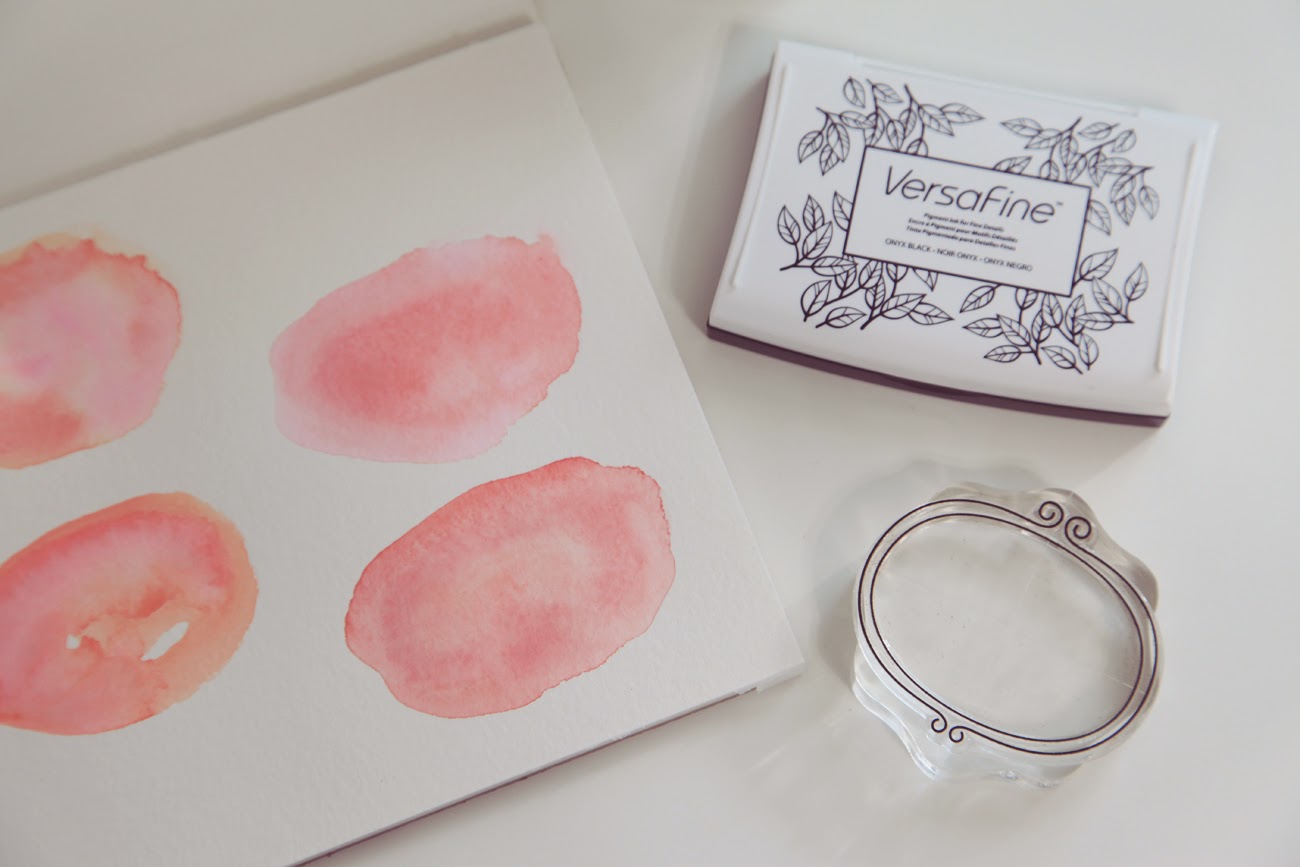
Now that I’ve covered the two main tools used for this project I’m going to get started on the labels. I just had a little cup of to water by my side and started to get my brush really saturated with water. Next I began to pick up color and simply create ovals on my paper—estimating the size they’d need to be to fit in the frame image from the Lawn Fawn stamp set.

Next I simply take some VersaFine ink in onyx black and start stamping the frame image over the abstract ovals—after they’ve dried, of course.

Once I stamped them all out I took my coordinating die and cut them out using my Cuttlebug. Once they’re all cut out you can store them away and save them for a party or you can use them right away like I did with these treat bags. I stamped out a few names on these labels using the Lawn Fawn alphabet stamp set, Violet’s ABCs. I made the treat bag using the awesome goodie bag die by Lawn Fawn—click here to view it. I also used their new paper line which can also be found, here. If you have any questions in regards to this project please feel free to ask! I really hope you enjoyed this easy DIY and if you have an Instagram feel free to DM me your projects! I love when people do that—it makes my day. You can follow me @unifyhandmade.

Have a great weekend!  

Pink Lemonade Party Theme using, the Lawn Fawn Pink Lemonade Collection Kit

Monday, June 17, 2013

Today I have a super fun picture tutorial over at the LawnFawn blog. I wanted to great a ‘Pink Lemonade stand’ party theme using the awesome, Pink Lemonade Collection Kit, and I think it came out so cute! To view complete tutorial on how I created this party set, feel free to view their blog by clicking here. I hope you’re inspired! 

Customer Appreciation Photos

Monday, June 10, 2013

I received these super amazing pictures from an awesome customer that purchased these ‘Babies are such sweet beginnings’ cupcake toppers from my shop. I always get so happy when customers send me pictures like this because secretly, when I’m working on orders, I always wonder where they’re going and how they’ll be used—kind of wishing I could be there to see, hehe. So, getting pictures almost makes me feel like I was there. I truly love everything I make in my shop and I’m so happy I get to share my creations and have them displayed at special events; such as this baby shower.

I also love how she used the cupcake toppers in the flower arrangements—that’s something I've never thought of, and it looks so cute—she’s so creative!


I’d like to give a big THANK YOU to, Kelly, for sending me these pictures; and, for letting my creations be a part of such a special day. 

Centerpiece Decor Idea

Monday, January 7, 2013

While I was creating a scene for a photo-shoot showcasing my new wedding table numbers, I stumbled across a really cute way to decorate centerpieces using 12 x 12 pattern paper. I've mentioned in the past that I’m not so great at flower arranging, and I really don’t like using clear vases because you can tell I’m a novice at it, with all the stems and leaves going in every which way—so this time around I thought I’d simply cover them up with extra pattern paper I had laying around; and, it looks SO CUTE! So, I thought I’d share this little decorating tip and show how I did it, and how you can use any kind of paper to do it.
All you’ll need, to cover a clear vase is, 12 x 12 sheets of pattern paper; and, you can find this type of paper at your local Michaels or Joanns. They both have a great selection of pattern paper, and they usually have them on sale for about 5 sheets for $1.00. Next you’ll need either a papertrimmer or a ruler and scissors, and clear tape. Instructions: All I did was cut a 4” strip of the pattern paper, wrap it around the vase, and adhere it with some clear tape—and that’s it! You can even get creative with this and apply some adhesive pearls, gems, or even ribbon around to have it match your party decor  This idea will work perfectly with: weddings, birthday parties, baby showers, and so much more! 
I think the brown pattern paper is my favorite. It looks so elegant! I can’t wait to have a party so I can get creative with this. Thanks for stoppin’ by and happy Monday! 

D.I.Y.--Last Minute Birthday Party Treats and Decor

Thursday, September 20, 2012

The best things about hosting a last minute party is that it won’t cost you a pretty penny, and knowing that you don’t have stress out about all the planning and organizing that usually come along with hosting a party. The theme I used for my nieces ‘last minute’ 2nd birthday was a ‘colorful’ theme. Using a ‘colorful’ theme means nothing has to match! I didn’t have to spend time looking for matching napkins, table cloths, and sweets. All I had to do was dip into my crafting closet and figure out what I had on hand that could be used. As a crafter/blogger I like to have certain things; such as, paper straws, tissue paper, cardstock, icing, box cake, sprinkles, and more, in stock for my photoshoots—and for this last minute party I was grateful to have stored a collection of these items. Although if you’re not a crafter or a blogger most of things I used for the party are very cheap and easy to find. Here are some pictures of the stuff I like to keep stocked in my crafty closet:

Tissue paper…because I never know when I’m gonna need a pom-pom, haha!
Craft punches
Glue
Twine
Paper straws
Mason jars
Cardstock
Cupcake wrappers
Kraft treat bags (for party favors)
…and the ingredients to make cupcakes, cakes, or cakepops
For the table setting I hung three pom-poms from the ceiling and tied a colorful handmade garland to each one. We also bought a small set of multi-colored balloons, a colorful $2.00 table cloth, and polka-dot napkins (all of these things were under $10.00). 
Here’s how I made the garland: I used my heart shaped craft punch to make a few hearts in a variety of colors. Next I folded them, applied glue, and adhered them the twine. Once they were done I attached them to the pom-poms I made. If you’ve never made a pom-pom before you can go ahead and give it a google—You’ll find tons of tutorials. 


For dinner we got pizza, fried chicken, and chips (all of her favorite things, lol)—all of which were under $25.00. 
As far as her birthday treats my little sister used the boxed cake, and icing container to make the cupcakes and cakepops. As you know one box makes 24 cupcakes—so she made all 24 of them, iced 12 and used the other 12 to make the cakepops! Clever. (You can view more of her work here on her FB fan page). 
Once dinner was done, we opened presents and sang happy birthday to my little niece Sammy; and, as you can see from the images she was not at all disappointed with the absence of a cake. She was perfectly happy with her cheap cupcakes, lol. 
…but she wasn’t happy when her grandma’ tried to smash a cupcake in her face! We had to distract her from crying by putting a cakepop in her hand, haha! 
She wasn’t fooled—she replied with, “get out!” (jk, I just wanted a reason to use this cute sad face pic, haha).
Well thanks for stopping by again! I hope you've enjoyed this D.I.Y. last minute party idea! I found out about this party the day of, but I was super happy with what my sisters and I were able to come up with in such a short amount of time. I think that was the fastest I’d ever made pom-poms, haha. Overall, baby Sammy was super excited when she walked through the door and saw all we had done for her—and that was worth everything! 

Foodie Friday—Cupcakes!

Friday, August 10, 2012

Yes! It’s Friday; and, I’m happy to post about the latest cupcakes I’ve made. I absolutely love making cupcakes (even though I didn’t get to eat any of these). Making cupcakes is so much fun for me; and I love everything about making cupcakes—from using different color cupcake wrappers, choosing the frosting color, and lastly, using them for my cupcake topper photo-shoots.

While I was planning how I was going to make this cupcakes I thought, perhaps some people would love to see how I go about making them and here’s how I do it!

First, I flip through one of my favorite magazines, The FoodNetwork Magazine, and decide which color I’d like to use. I have a special issue that has a list of icing colors and the amount of food coloring drops needed to acquire the color I may desire; and, for this project I wanted to use the color Jordan Almond—which is listed at 12 drops of blue food coloring with 1 drop of red food coloring per 1 cup of icing. 

Second, I add two cups of store bought (non-creamy icing) to a bowl, add 24 blue food coloring drops and 2 red food coloring drops then mix. 


Third, I grab my wonderful collection of assorted cupcakes, and choosing my favorite ones. 

Lastly, I pipe the cupcakes and get them ready for their photo-shoot! I made new cupcake toppers using a cloud shaped craft punch, and hand stamped, hand cut toppers using my favorite stamps by Lawn Fawn. Aren't they super cute?


Photo-shoot days are always fun but adding cupcakes to the mix makes them even more exciting and I’m glad I was able to share this with you. If you'd like to purchase some of these adorable cupcake toppers they'll be available in my shop very soon. I hope you have a perfect Friday! Enjoy your weekend :-D 
Proudly designed by | mlekoshiPlayground |