Showing posts with label card making class. Show all posts

Card Making 101--Chapter 2, Card Base

Monday, March 4, 2013

Hello! Welcome back to class, hehe. Today I’m going to be talking about creating a card base out of 8 ½” x 11” cardstock. Today I’m using a cream colored cardstock, by Recollections but feel free to use any paper or cardstock that you like; or, prefer—just make sure it’s the same size that I’m working with. We’re going to be using this paper to create what’s called an ‘A2 standard size’ card which measures at: 4 ¼” x 5 ½”. What’s so great about using the 8 ½” x 11” cardstock is that you can get two perfectly sized A2 cards out of one sheet of paper; and, you can create a tent style card or a book style card as well. If I’m losing you already feel free to scroll down while I explain more. 
In the picture above, I have the ‘tent’ style A2 size card which opens from the bottom, and I have the ‘book’ style card on the right that opens from the right. 
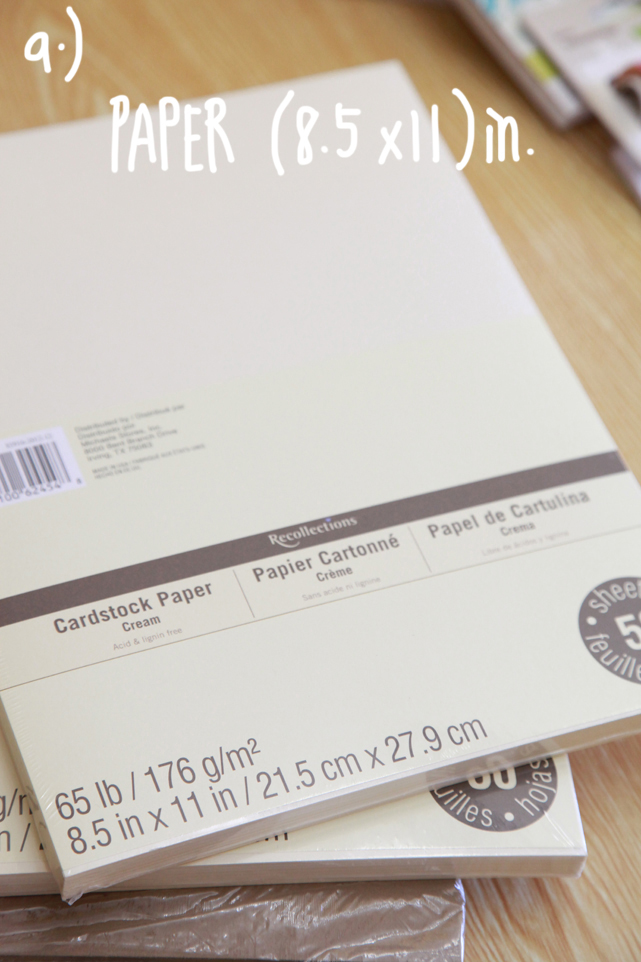
Here is a picture of the paper I’m using, I purchased this from Michaels, but feel free to use any type of paper or cardstock you can find. Even using computer paper works—it’s the same size as this card stock, shown in the image above. 
First I’m cutting a A2 tent style card; therefore, I’m laying the longest part of the card, vertically—with the paper trimmer.
 Next, using the paper trimmer, measure 4 ¼” and cut. This will give you two 4 ¼” x 11” pieces, shown in the image below. 
Next, you simply fold the card in half, creating a 4 ¼” x 5 ½” card base. Example of finished result shown below. 
A2 Book
Yay! Now we can move on to the A2 book style card. We start by laying the longest part of the card, horizontally.
Next, using the paper trimmer, measure 5 ½” and cut. This will give you two 5 ½” x 8 ½” pieces, as shown in the image below.
 Next, you simply fold the card in half, creating a 4 ¼” x 5 ½” card base.
There you have it! Two different style A2 size cards—now that the boring stuff is over we can finally start playing with our stamps and pattern paper, but that’ll have to wait until next Monday. I hope you’re enjoying this series as much as I am. I hope that this is helping someone is wants to learn the very basic skills for cardmaking. Thanks for stoppin' by :-p

Card Making 101--Chapter 1

Monday, February 25, 2013

Hi everyone! My work schedule is finally back to normal and as promised I've brought my new series, ‘Card Making 101’! I’m so excited to share all the tips and tricks that I know, on making cards. This series will be totally free from start to finish and I hope you really enjoy it. If you've ever wanted to learn more about the tools I use or how to make cards these posts’ will definitely keep you entertained. I’m not a pro when it comes to card making, but I love showing others how to let loose and get creative! Today I’m starting off with chapter 1, which will consist of all the tools I use when creating cards. None of these tools are must-haves but these are some that I love using, and I’ll even show how to make cards without these tools, in future posts', for those who wouldn't want to spend money on something they’re not too sure about.  So, let’s get this party started. 
A.) Paper/Cardstock: To create a card base you can use any type of paper you like; however, I love using 8.5in x 11in size cardstock (in any color). You can find this paper at your local Michaels, Joanns, Office Depot, or even Staples. The reason that many card makers love to use this size paper is due to the fact that you can get two A2 (standard size: 4.25in x 5.5in) cards out of one sheet; and, I’ll talk about this more in chapter 2.
B.) Pattern Paper: You can use any type of pattern paper that you like. I like to use mini paper packs and single sheets purchased from my local Michaels, Joanns, or Lawn Fawn. You can use this piece to decorate your card; and, it adds so much color and flare to them.
C.) Paper Trimmer: This is the tool that I use to cut cardstock and pattern paper. It’s so helpful in cutting with precision. This can also be found at your local craft store.
D.) Scoring board: This is used to create score marks for precision folding, and comes in handy. However, you don’t need this in order to create cards. I have on because I make tons of them, hehe. I’ll go into more detail about this tool in chapter 2, as well. You’ll also notice number 1, which is a scoring stylus, and number 2, which is bone folder. Both tools help with scoring.
E.) Stamps: My favorite thing about card making are my stamps! I love collecting stamps—all types. Stamp types pictured are as follows: number 1—rubber stamps, number 2—acrylic stamps, number 3—photopolymer stamps. The differences in types and the kind of inks these stamps use will be described in more detail in chapter 2. 
F.) Ink: I love using different types of ink when stamp; however, the type of ink to use for different types of stamps was always a mystery to me—and I learned which inks work best with each type of stamp the hard way, hehe. 
G.) Acrylic blocks: These are used with the clear and cling stamps. They come in different sizes and shapes. These work so well with precision stamping because you can see through the block and stamps! You can find these at your local craft store. 
H.) Adhesive: I love using my ATG because I make a lot of cards for my shop (ATG, number 1) but you can purchase any other type of adhesive glider that will work for you (number 2). You can find a wide variety of adhesives at your local craft store. These are used to adhere your pattern paper, ribbon, and other embellishments you might want to add to your card. Card makers love using this type of adhesive because wet glue can cause the card to bend in really weird ways, haha, and these roll adhesives adhesives leave a nice finish. 
I.) Die Cuts: I like to use my die cuts from time to time, to cut shapes that I can use when creating a sentiment. For instance, these spellbinders and craft punches. They work so well and I’ll go into more detail about these in chapter 2, as well.
J.) Markers: great for stamps you can color in; and, great for coloring in paper-pieced images as well.  You don’t need this specific set of markers to color in your stamped images, though. You can use regular markers; or, even color pencils.
K.) Ribbon and Twine: I love using ribbon and twine to add flare to my cards, they are so pretty and come in such a wide variety of colors and prints. I can’t wait to show you how I use these.

That's it for chapter one! I can't wait to get started on this so you can get inspired and craft along with me or use this series in the future if you'd ever like to try card making. I hope I didn't confuse you with any of the crafting terms and tools; however, it'll get a lot easier when I'm showing you in detail how to create your own cards with these tools in chapter 2 and beyond. Thanks for stopping by and I hope you come back next Monday for the next chapter. 

Crafternoon

Friday, January 11, 2013

Today was so much fun! My sisters have been asking me to teach them how to make greetings cards for some time now and we finally managed to sync our schedules’ so that we could have a ‘crafternoon’ card making class. I taught them the basics of card making, stamping, and paper piecing. I was laughing at how they’d listen to a little bit of information I’d give them, then be like, “Ok, got it” and start pulling out all the stamps, ink, and paper, and then get stuck and not know what to do because they weren’t listening to me in the first place. But, it’s totally understandable. How can you sit in front of all these awesome crafting tools and expect to be lectured, LOL. I thought that was really funny and I was teasing my sister about that for the rest of the time, haha. A little while later I managed to convey all the basic skills they’d need to complete a card, and they caught on well—very well actually.
I talked to them about the different types of stamps there are; such as, acrylic, silicone, rubber, and photopolymer. The different kinds of ink you can choose from, and how to keep stamps nice and clean. We also used my new Copic markers. I’m so in love with them.
Here are their cards! The Valentine’s Day themed card was created by my youngest sister, Melanie, and the card on the right was made by my older sister Angie (who I call, Angus). I have a nickname for everyone.
We were also visited by our beautiful niece—who also loves to craft. I bought her, her own stamps, paper, and ink…but that still doesn't keep her from dipping in my stash. So I figured I might as well teach her how to properly use them if she’s planning on using them on a regular basis, haha. She’s so cute. Lastly I've been thinking about creating a ‘Crafting 101’ feature here on my blog for those that would like to start scrapbooking or cardmaking. What do you think? Is that something you would like to see on my blog? I think if I get enough votes I just might do it :-p 
Proudly designed by | mlekoshiPlayground |