How to Make a Paper Bag House for Christmas Packaging

Thursday, December 13, 2012

I have a super cute way to package all the mini Christmas gift items—actually, this would also work as party favors, or treat bags if you’re hosting a Holiday party. Plus, it’s simple, affordable, and very easy to assemble. So easy in fact, I didn’t even bother to take pictures of how I did it—or maybe it’s because I was being lazy. Either way, this is a fun project!
So, all you’ll need for this project is: Brown paper bags from your local dollar store, white cardstock, any pattern paper or wrapping paper for the door and shutters, black cardstock, ribbon, a hole puncher, glue, scissors, and serrated edge scissors (any edge will work).
For the roof, I cut a piece of white cardstock at 8” x 5 ½” folded it in half, and cut the ends using my serrated edge scissors, and set aside. I cut piece of pattern paper for the door at 2” x 2 ¾” and used my hole punch on some scrap white cardstock for the door knob. Next I cut the green part of the window at 2 ½” x 2 ¼”, and cut a white piece of cardstock at 2 ¼” x 1 ¾”. Stamped a tree image in green and adhered it to the green window piece (if you don’t have a tree stamp you can simply cut a tree out of another piece of plain or pattern paper). Next, cut out a few slim strips of black cardstock for the window frame and adhere those. Once those two pieces are finished, you can apply them to the brown paper bag. Next cut out a thin piece of white card stock and hand cut some waves on it for a cute snowy effect, and adhere that onto the bag as well. Once all of those eliminates have been glued you can fill your bag with treats, a gift, or party favors! Fold the top over, and place the white cardstock roof over the fold, and using your hole puncher, punch two holes near the top of the bag and apply your ribbon closure. A-dor-a-ble! Thanks for stopping by! 

My Plans for a DIY Paper Ornament Christmas

Monday, December 10, 2012

I love Monday’s because it means I’ve got so much crafting to do. On Monday’s I’m usually finishing up orders that I’ve received over the weekend, working on my blog, shipping packages, planning for future blog posts’, and work more orders again, hehe. This year I’m planning to make about 80% of the ornaments on the Christmas tree; and, I’m excited to be getting my family involved with this process. So over the weekend I was doing research on the internet trying to find out how to make paper rosettes and other types of paper ornaments that I’d like to use. There are a few types of paper ornaments that I already knew how to make but I wanted to learn how to make a wide variety of them so that I don’t have the same two types of ornaments all over the tree, haha. As of now I’m gathering my ideas, and testing them all out. Once I’m sure of all the ornaments I’m going to want on the tree I’ll start the little papercraft party with my sisters—that’ll be so much fun! I’m sure wine will be involved.
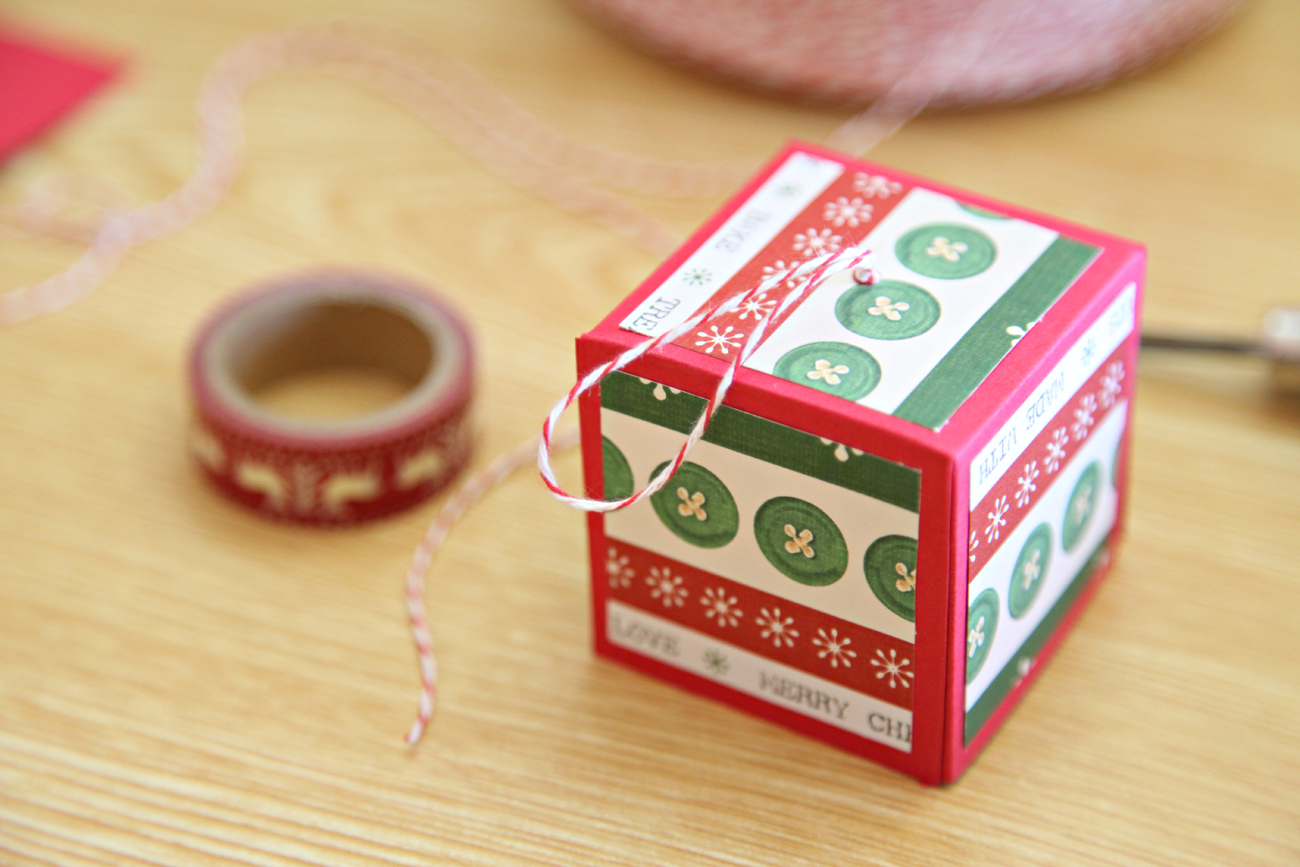
My first paper rosette! ^^ + Below I'd like to share how I went about making the mini paper boxes. They're so cute and I hope you give them a try :-p
For the box you'll need your favorite piece of pattern paper, two 6"x6" pieces of card stock (any color), a score board, and a scoring tool. 
Take the two pieces of 6x6 card stock and make your score marks at 2" and 4", next rotate and repeat. 
 Next, cut like so; and, fold the score marks with your finger or bone folder. 
Next, cut 5 pieces of pattern paper at 1 ¾” by 1 ¾” and adhere them as show in the picture below. 
Next make a small hole in the center of the box, tie some twine with a large knot and slip through the hole, and secure with a piece of tape. 
 Now you can assemble the box like so:
 ...and repeat those steps for the bottom of the box (minus the pattern paper). 
There you have it! Isn't it cute? I can't wait to figure out all the ornaments I'm going to make. I'll definitely keep you in the loop along the way :-p Thanks for stopping by!
Modcloth Wish List

Friday, December 7, 2012


If I was given a magic credit card I would totally buy every single thing on this list! I absolutely love all the dresses, shoes, etc. in this list. Each piece is something that I would wear—depending on my mood. I’ve noticed that I tend to dress in certain ways depending on my mood at the moment. For instance, some days I’ll wear my natural looking eye make-up with a little bit of blush, and dress in bold happy colors; and, sometimes I’ll wear all black and completely drench my eyes in black eye liner. I just never really know hehehe. So, every item in my wish list will serve a purpose in my life if I could get them all, LOL. Oh gosh, I REALLY want that black sequence dress! They even have it in my size!!! (14) I so want this…but I must be good and save money. Well, these beautiful items will have to stay forever in my wish list because I’m sure they’ll all sell out soon. Speaking of selling—I’ve been doing so great with my Etsy shop. I just want to say thank you to everyone who bought something from me for Christmas this year, I really appreciate you supporting handmade! I also want to thank all my blog readers who have been putting up with my late blog posts’ due to my 18 hour holiday working hours. I’ve tried not to let the busyness get to my blog. So BIG thanks to those who still stopped by and commented when I’d post late or on the wrong day, haha. I love reading your comments and I’m always excited when I get a new comment. I hope you have a great weekend + come back next week because I have lots of holiday DIYs, papercrafting, and recipes planned until Christmas day! 

Handmade Wrapping Paper

Thursday, December 6, 2012

Being a full time papercrafter means I always have stamps on hand—in all types of styles themes and sizes. So, it’s only natural that I make my own wrapping paper for Christmas, right? One thing I absolutely love about making my own things is they're so original and OOAK; and, homemade things can’t be found anywhere else. I bought this brown Kraft wrapping paper at the dollar store, and I already had the stamps, ink, and twine on hand. So I’m super excited that this entire project was only $1.00.
The stamps I used to create these two types of wrapping paper are made by the awesome, Martha Stewart. One of the sets is a year or two old, and the other is brand new for X-mas 2012. I was lucky enough to find these in the store—and when I find Martha Stewart stamps in the craft store I ALWAYS buy them; namely, because I can use my 50% off coupon and get it cheap. Plus, Martha Stewart stamps are basically like collectors’ items because once these items come out they don’t come out again, and they end up being sold for double or triple on ebay. To view the stamp sets I used click here and the other set is so rare that I couldn't even find a link for it online :/
I had a lot of fun making this Christmas wrapping paper—I think I’m going to make a few more designs and pass them out to my loved ones. I’m sure they’ll like that. 

Handmade Stocking Stuffer

Tuesday, December 4, 2012

Stocking stuffers tend to become an afterthought as I put most of my time and energy into thinking of how I’m going to decorate for Christmas in a new way, decide what gifts to buy my loved ones, and what outfit I’m going to wear. But this year I wanted to make a stocking stuffer that had a lot of thought and effort put into it and I came up with these mini note cards that can be placed into a festive tin box and used year round.
Holiday themed tins come in a wide variety of sizes and designs at our local craft stores like Michaels and Joanns. I found this particular owl tin at my Joanns; and, I was pleasantly surprised to see that their selection of Christmas merchandise was already 50% off. I think it’s super cool that tin boxes never really go out of style, and as time goes on the tin designs get cuter and cuter. Larger tin boxes can also be used for storing handmade stationary too. I can imagine a larger tin holding handmade note cards, envelope seals and tags, all separated by handmade partitions. 

Lawn Fawn, You've Got Mail
Every time I’m thinking of making whimsical paper art I always turn to my growing stash of Lawn Fawn stamps. For this project I’m using my newest set, ‘You’ve got mail’, and my Miss Caroline set by, My Mind’s Eye.

I started by cutting a piece of ivory card stock at 3” x 4 ½” and I rounded off the corners using my corner rounder punch—this way it’ll fit perfectly into the tin. Next I used the doily stamp from my Miss Caroline set, and used a pale pink chalk ink to add some cute boarders to the top and bottom of the note card. Next use my mini flag banner stamp all the way at the top of the card for extra added cuteness, hehe.  Next I whipped out my Lawn Fawn stamps and used my, Love ‘n Breakfast, set to create the floating hearts behind the mail box and colored them in with pink stamp markers—stamp markers work so well and they don’t bleed into the paper leaving a shadow behind the paper. After doing that I used the ‘sending love your way’ sentiment and also used the postage stamp in light blue and light green over the text.
Once that was finished I took the mail box and stamped that image onto a piece of blue and white patterned paper, and stamp the envelope image onto a piece of white card stock. Next I cut out the mail box and adhered it to the mini note card using my clear Tombo Mono liquid glue. After that I cut out the small envelope and cut the corner of the bottom left side off. That way I could glue it to the mail box and have it look like it’s on its way into the mail box. When I was completely finished I placed all the mini note cards into the tin and wrapped it up in a glassine envelope, bakers twine, and a handmade snowflake seal.

Make your stocking stuffers special this year and make them yourself! These mini note cards are perfect for everyone and anyone— simply create a note card that fits the recipients personality using a computer, stamps, or even hand drawings. The possibilities are endless. Cheers to making it yourself! 

How to Make Paper Straw Snowflake Ornaments

Saturday, December 1, 2012

Happy first of December! I’m so excited to share these super cute ornaments I made out of my left over paper straws I had in my crafty closet. I’ve always wanted to try makin’ something out of these straws because they come in such a wide variety of colors and because they look retro. You’ll love making these—I know I did.
 You'll need 16  straws to create the large star. 
Simply fold all 16 straws into an L shape--as shown above and glue two pieces together as shown in the image below. 
 Next you can glue each piece together to get this beautiful retro looking star! 
 Below are the sizes I used to create this medium size snowflake and medium size star. 
 For the cute snowflake you'll need: 1 regular size straw, 6 straws cut into 4 inch pieces  and 16 straws cut into 1 inch pieces. Don't forget to cut one end of the 1 inch straw at an angle--so that it will lay nicely when your ready to adhere it. 
Lastly, for the medium size star you'll need: 1 regular size straw, and 5 straws cut into 4 inch pieces. Take the regular 8 inch size straw and fold it into a pentagon. Next take the 5, 4 inch straws and fold them in half. 
I hope you love this cute and simple retro holiday DIY tutorial. Everyone in my house fell in love with them as soon as they saw me hanging them around the house, and now I'm thinking about trying to create more shapes. Give this a try for Christmas and if you make some send some pictures of them my way! I'd love to see what you create! If you have any questions feel free to leave a comment!
Proudly designed by | mlekoshiPlayground |